


- Product Describe
-
Product Parameters
Model Chamber Size Chamber Material Heating Power Overall Dimensions Total Weight 101-1A 350×450×450 mm Galvanized Sheet 2.0 kW 710×550×710 mm 45 kg 101-1B 350×450×450 mm Stainless Steel 2.0 kW 710×550×710 mm 45 kg 101-2A 450×550×550 mm Galvanized Sheet 3.0 kW 810×650×810 mm 62 kg 101-2B 450×550×550 mm Stainless Steel 3.0 kW 810×650×810 mm 62 kg 101-3A 500×600×750 mm Galvanized Sheet 4.0 kW 860×700×1000 mm 70 kg 101-3B 500×600×750 mm Stainless Steel 4.0 kW 860×700×1000 mm 70 kg 101-4B 800×800×1000 mm Stainless Steel 6.0 kW 1130×990×1300 mm 126 kg Overview
The 101 series drying oven is a high-temperature test auxiliary product designed and manufactured by our company according to national standards. It features a beautiful box design, light weight, fast heating speed, uniform temperature, and good insulation performance. It uses a high-precision intelligent temperature controller with a sensor that has cold junction compensation. The heating power is regulated by a silicon-controlled rectifier, providing stable temperature and simple operation.
This oven is specially designed to provide high-temperature conditions for industrial production and scientific research units, mainly suitable for drying test specimens and other materials.
Structural Description
The outer box of this oven is made of cold-rolled steel plate, and the inner chamber is made of galvanized sheet or stainless steel. Between the outer box and the chamber, aluminum silicate fiber cotton and asbestos board are filled as insulation layers. The electric heater uses a far-infrared heating radiator and an internal circulation blower to ensure more balanced air convection.
Technical Parameters
A. Standard drying temperature: 105℃
B. Temperature control accuracy fluctuation: ≤2℃
C. Maximum working temperature: 250℃
D. Power supply voltage: AC220V/50HZ
Model series and their parameters:
Model Chamber Size Chamber Material Heating Power Sensor Specifications Overall Dimensions Total Weight 101-1A 350*450*450mm Galvanized Sheet 2.0KW Type K Thermocouple 710*550*710mm 45Kg 101-1B 350*450*450mm Stainless Steel 2.0KW Pt100 710*550*710mm 45Kg 101-2A 450*550*550mm Galvanized Sheet 3.0KW Type K Thermocouple 810*650*810mm 62Kg 101-2B 450*550*550mm Stainless Steel 3.0KW Pt100 810*650*810mm 62Kg 101-3A 500*600*750mm Galvanized Sheet 4.0KW Type K Thermocouple 860*700*1000mm 70Kg 101-3B 500*600*750mm Stainless Steel 4.0KW Pt100 860*700*1000mm 70Kg 101-4B 800*800*1000mm Stainless Steel 6.0KW Pt100 1130*990*1300mm 126Kg Temperature Control Adjustment Method
This device uses intelligent temperature instruments model 101-B XMTD-202C and 101-B XMTD-702 as temperature controllers, compatible with sensor models 101-B PT100 and 101-A Type K thermocouple (temperature controller with cold junction compensation). After single-point temperature calibration, accuracy can reach 0.5℃.
Temperature controller operation method is as follows:
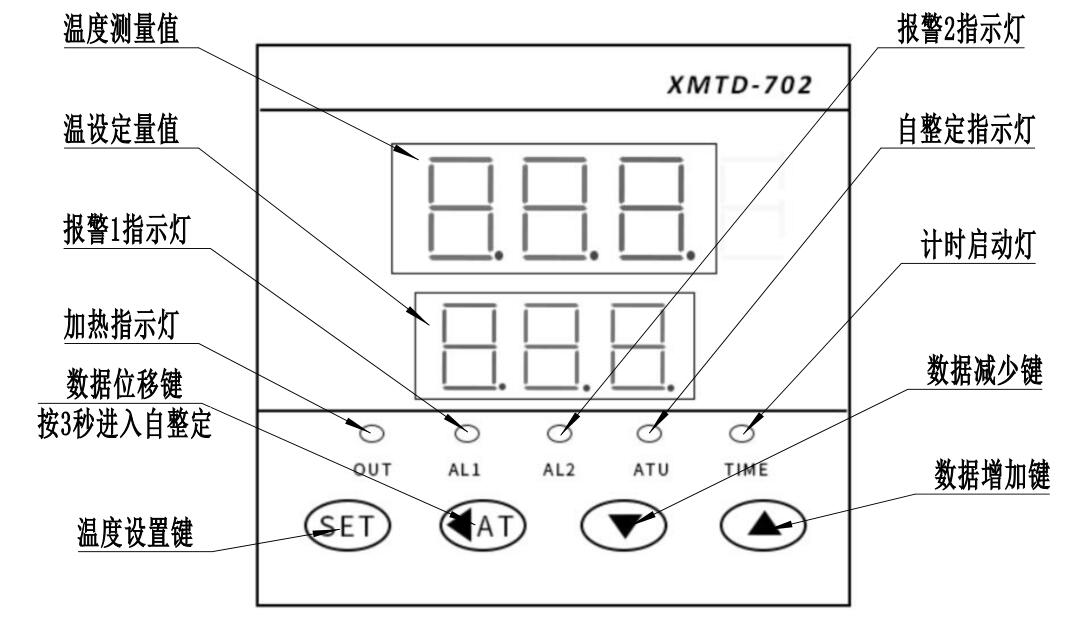
- Set temperature: Press the SET key once to set the temperature. The lower row of the digital tube flashes (upper row shows normal temperature measurement), indicating the instrument is in temperature setting mode. Press the △ key to increase the set value, press the ▽ key to decrease it, then press SET again to return to normal working state and complete the temperature setting.
- Sensor error correction: Press and hold the SET key for 3 seconds to enter the instrument's inner menu. Select parameter SC and use △ or ▽ keys to correct the error. Display resolution is 0.1 degrees. The correction range for sensor error is ±19.9; for 1-degree display resolution, the correction range is ±50 degrees. Press SET for 3 seconds to exit. The factory correction value is 0.
- Start auto-tuning: This product can adapt to most control systems. Auto-tuning should only be started if the control effect is particularly unsatisfactory. Method 1: After powering on the instrument, press the displacement key for 3 seconds to start auto-tuning. Method 2: Press and hold SET for 3 seconds to enter the inner menu, select parameter At, press △ to set the lower row to 1, then press SET for 3 seconds to start auto-tuning. During auto-tuning, the Atu indicator flashes. The process involves the instrument controlling the heating system to oscillate twice near the set point. When the Atu indicator goes off, auto-tuning ends and the new PID parameters are locked in the chip.
Setting and explanation of instrument function parameters (press SET for 3 seconds to enter inner working parameters)
Code Parameter Meaning Description Setting Range Default AL1 Alarm 1 Parameter Temperature control point for Alarm 1 relay action 0—Full scale 5 AL2 Alarm 2 Parameter Temperature control point for Alarm 2 relay action 0—Full scale 10 FAL Alarm Point Hysteresis Dead zone for alarm output action sensitivity 0—Full scale 1 P Proportional Band If P=0, it is on-off control. If P is not zero, the instrument is proportional output PID control, where P is the dynamic working range. 1℃-200℃ 20 Hyc Main output offset Main output action insensitive zone (appears when P=0) 0-50℃ 2 I Integral time constant Eliminate static error, the instrument's intensity of output energy regulation. The smaller the I value, the stronger the regulation ability. 0-999 seconds 200 d Differential time constant Pre-regulation ability, the speed of regulating output energy when the measured value changes. The larger the D value, the faster the response. 0-999 seconds 50 T Proportional cycle The total of heating and cut-off time forms one cycle. The instrument controls output power by adjusting heating and cut-off. 1-200 seconds 20 Sc Measured value bias Sensor error correction ±19.9 0 At Automatic adaptation The instrument automatically selects appropriate control parameters. 0 off / 1 on 0 EP Proportional band offset Used to prevent temperature overshoot after the instrument cold start. 10 10 Lck Parameter lock 0: No lock; 1: Lock inner parameters;
2: Lock all parameters
0-2 0 Usage instructions
A. Connect the grounding wire of the drying oven properly (grounding point is at the back of the oven). Use a megohmmeter to check that the insulation resistance between the power input line and the casing is >2 megaohms.
B. Adjust the instrument's setting keys to the desired temperature. If it is a digital display, set the number to the required temperature.
C. Turn on the power, switch on the power switch, and also turn on the auxiliary heating switch and fan switch. Auxiliary heating allows the drying oven to heat up quickly, and the fan is used to make the temperature inside the oven uniform. After reaching the set temperature, turn off the auxiliary heating switch, and the drying oven will maintain a constant temperature automatically.
D. After using the instrument, open the oven door to release the hot air inside the chamber, disconnect the power, and wipe dry with a cloth.
Precautions
When using a new drying oven or one that has been unused for a long time, check for any damage and perform insulation resistance tests. The insulation resistance between all live parts and the casing, as well as between each other, should be greater than 2 megaohms. Ensure the drying oven and power connectors are secure to avoid damage due to poor contact. Do not place flammable materials inside the oven to prevent accidents.
Due to the high power of this equipment, it is strongly recommended that users connect a 32A circuit breaker in series with the power supply to prevent circuit damage and avoid safety hazards.
The load capacity of the shelves varies by model. Do not place excessively heavy items on the shelves. Use stainless steel trays to support items to distribute the load points and avoid deformation of the shelves due to excessive point load.
Troubleshooting
Phenomenon Cause Repair method No heating Infrared heating wire damaged, temperature sensor loose, temperature controller relay not engaging. Replace heating wire, check temperature sensor wiring and heating actuator components such as SCR BAT41 and solid-state relay D4840. No temperature maintenance Temperature sensor loose or damaged. Check temperature sensor screws or replace sensor. No fan operation Fan connector not secured, motor burned out. Check wiring connections, replace motor. Oven leakage Heating wire detached, insulation board damaged. Check wiring and heating wire from SCR BAT41 and solid-state relay D4840 output to heating wire for damage, detachment, or grounding issues.
Company Profile
Hebei Yinfeng Experimental Instrument Co., Ltd. is a high-tech enterprise dedicated to the research and development, production, and sales of experimental instruments. The company is headquartered in Hebei Province, relying on the strong industrial foundation and technological innovation resources in the Beijing Tianjin Hebei region. It is committed to providing high-precision and high reliability testing equipment and solutions for material testing, engineering quality control, scientific research experiments and other fields.


Customized Delivery Process
We provide customers with full-process services ranging from pre-sale consultation, customized solution design, equipment installation and commissioning to after-sale technical support.
Online Communication
Provide Custom Drawings
Merchant Quotation
Sign A Contract
Processing And Production
Packaging And Distribution
Confirm Receipt Of Goods
Successful Transaction
Previous:
Next:
Drying Oven
If you need customized products, Contact US !
Share to


Category
Tag list
Request a Quote
We will contact you within one working day. Please pay attention to your email.
Related Products
Content update in progress
Message
We will contact you within one business day. Please note your email address.
Fast navigation
Contact Us
Whatsapp/Tel: +86-15931715356,+86 16631790555
E-mail: qcj@cnhblabequipment.com
Add: Chengnan Industrial Zone, Xian County, Cangzhou City, Hebei Province

Online Message